
Showing posts with label Reno. Show all posts
Showing posts with label Reno. Show all posts
Friday, April 19, 2013
Bathroom Reno Installment #2 continued...
continuing on from the previous post... With the help of my good friend N this morning, we did the final filling, sanding and two coats of stain block/sealer. Which got us to this point (see pic below) which is a far far cry from the original bathroom (scroll down further for 'original' bathroom pics)...


Bathroom Reno - Installment #2
Installment #1 began a while ago with a $25 basin top find at the local 'recycle yard'. The reno got to that point and paused (that's a nice way to say, ground to a screaming halt). Except to say by chance, that a storm meant water damage to the ceiling (the light became a water feature) and via insurance the light was fixed and the ceiling repainted. Which is what insurance is for I gues, when there's storm damage but it also means no 'before' and 'after' photos of the ceiling which was pretty horrid... and one less (very major and icky) job to do on the 'to do list'.
I've been prepping on and off for the last two weeks and hopefully tomorrow get some paint on the walls. There was a fair bit of prep work to do. Still more tonight but that's for a little later on. A few 'before' and 'current' pics - because the 'after' pics haven't had work finished for them yet.

I've been prepping on and off for the last two weeks and hopefully tomorrow get some paint on the walls. There was a fair bit of prep work to do. Still more tonight but that's for a little later on. A few 'before' and 'current' pics - because the 'after' pics haven't had work finished for them yet.

Wednesday, September 07, 2011
Bathroom Re-do
When we did the kitchen, the plumber informed us that since we (unexpectedly) had to redo the entire plumbing for the kitchen, which meant cutting a trench diagonally across and through the floor in the back room (slate tile) and out to the back yard to the something-or-other, and after looking at the bathroom said, "don't do this room in a hurry because you're going to need to do the same".
Rather off-putting. BUT in the meantime, there are things that have been repaired several times over, or are just beyond repair. So the bathroom re-do is going to be 'cosmetic' and functional without touching the bones/guts of the room itself.
Currently it's an old brown/white tile on the floor like a jigsaw pattern
Rather off-putting. BUT in the meantime, there are things that have been repaired several times over, or are just beyond repair. So the bathroom re-do is going to be 'cosmetic' and functional without touching the bones/guts of the room itself.
Currently it's an old brown/white tile on the floor like a jigsaw pattern
Tuesday, January 25, 2011
Three 'Free' Cushions in under Firty - bedlinen reno
Say it fast and see if you can get it right lol ... anyway... it began because I was admiring this bedroom on US Better Homes & Gardens 'Real Life Bedrooms'. I've never really 'got' how to use darker colours on the wall - actually no, I get that they work but I've always been a bit intimidated by them. Also I've been looking at various bed linen examples and found a few that I really really like but the price tag is well out of my reach. I'm not sure if this is my 'perfect' bedroom but it caught my eye and as my eye changes so too can the room, over time.
So I decided to pick out 'what works' from the pictures. Why does that room work the way it does? What of that room, can I replicate?
So I decided to pick out 'what works' from the pictures. Why does that room work the way it does? What of that room, can I replicate?
Saturday, January 08, 2011
Blog plodding
So I've been plodding round different blogs finding ideas - as you do. Organising, making rooms over... that kind of thing. Trying out thoughts and seeing which ones might work (since someone else has done them before) and which ones might not...
I like the finishes in this room here - if you click there's 14 photos in the slide show and this was their before picture... pretty good results. Yes, time and money. But you don't have to duplicate it exactly. So I've started to look at a room, work out why it works, how it's pulled together, what the 'key' bits are and seeing what I can come up with at this end... I have decided I need to paint our wooden trims. I really like raw timber but I think everything has a place and with natural flooring (synthetic timber (what a term) and slate), having too much wood doesn't always work... I'd like to do this on our doors - one because it's functional, two because it's appealing to the eye and three - well I think the pretend timber doors have to do something too because it's just another 'timber' and texture that doesn't quite 'fit'... and THIS for our non-existent fire place... [now where did I put that link - ah there 'tis!]...
So the brain is going into overdrive as usual. I'm gonna go ponder ideas over the dishes. Because you know, they'll only be there tomorrow otherwise... and it's not like there's actually basic stuff do like finish painting the kitchen or lounge before I tackle a new idea... ah but you gotta have dreams, right? Sleep happy all!
I like the finishes in this room here - if you click there's 14 photos in the slide show and this was their before picture... pretty good results. Yes, time and money. But you don't have to duplicate it exactly. So I've started to look at a room, work out why it works, how it's pulled together, what the 'key' bits are and seeing what I can come up with at this end... I have decided I need to paint our wooden trims. I really like raw timber but I think everything has a place and with natural flooring (synthetic timber (what a term) and slate), having too much wood doesn't always work... I'd like to do this on our doors - one because it's functional, two because it's appealing to the eye and three - well I think the pretend timber doors have to do something too because it's just another 'timber' and texture that doesn't quite 'fit'... and THIS for our non-existent fire place... [now where did I put that link - ah there 'tis!]...
So the brain is going into overdrive as usual. I'm gonna go ponder ideas over the dishes. Because you know, they'll only be there tomorrow otherwise... and it's not like there's actually basic stuff do like finish painting the kitchen or lounge before I tackle a new idea... ah but you gotta have dreams, right? Sleep happy all!
Sunday, January 31, 2010
Our kitchen renovation
it was a few weeks before Christmas 2007, and we were getting married in the Feb 2007, when we began our renovation. We had one child in nappies, one at Kindergarten and one in Primary (I think... I'll have to go back and work out dates). The kitchen reno was ten years in the planning on my part. Lots of research. Lots of checking out things in shops, magazines, researching appliances, surfaces, checking out things at other people's places, noting ideas, things I liked and didn't like, working out where power points needed to be, what was lacking in the current kitchen (lots LOL), what we had and what we needed room for etc etc I did up endless sketch and to scale plans. The final draft plan we paid Gordon to do ($70), and I worked on it some more from there - and changed a bit more. The point he impressed on me most was turn a negative into a positive... if you have to have for example a column for structural support that you weren't intending in the design, then eithe rmake it into a feature or set it up for storage... that kind of thing. I wanted to open up the entire wall on one side but that would have required a $3k structural beam and we just couldn't do that. So we compromised and left part of the wall in to hold up the roof, and that part of the wall I can put a big home-done print on, or whatever I like.
Finally... the circumstances that are life meant that so many things lined up to make it possible - one millimetre either way and it wouldn't have happened but everything fell into place...
So here's the 'before photos' - I'll add the 'reno in progress mess and dust and complications' ones and the 'finished/current' ones a bit later.
The first two pics are the kitchen.
 Use the stove as your reference point to 'join' the pics together in your mind... two 'door' ways and a window in there.
the next two pics are the room next to the kitchen.
 this pic above, the stove is juuuuust to the left of the pic - you can see the power cord where it's plugged in (installed by the previous owner, not us!) the next pic below is standing IN the 'dining' room (three doorways/entrances) looking north. in this pic, the small freezer that you can see above pic, is behind me in the pic below. Clear as mud eh... well basically two rooms, 5 doorways and one window...

As mentioned, one room was a dining room that had three door ways and no windows and we just didn't use eventually as it was so dim and really was a thoroughfare. The other room was a little kitchen, really only enough space for one person, with two doorways through it, a main thoroughfare, shallow benches and not much benchspace etc you get the idea.
We did everything except the legal stuff (plumb and electrical) and the wall removal, esp since it was partly structural. We did have a blowout in the plumbing (ummm we can use this drain but it's essentially holding together by time) which resulted in a trench right across the 'back room' which was interesting with a toddler and a gangplank. Not to mention that this was the room where 'everything' was (toaster, kettle and everything else) because the lounge was full of the flatpack, benchtops, appliances (as was the hall) and everything else that was in those rooms or had no other home was squished into bedrooms. We cooked and did dishes on on the outdoor table and bbq.
We almost halved the cost of the renovation by DIYing. We kept the slate we lifted from the kitchen floor (that was laid over the lino which we also removed) which was lucky because we needed it to repair the trench in the back room... a bout of viral arthritis made things very interesting along the way as in, couldn't turn on taps, open bottles or jars and at one stage dragged myself down the hallway because my knees couldn't work... but I did have a good friend come to the rescue with chocolates and yummies and a hug... and she freeway-trekked to do it.
Fresh coffe and buns/biscuits/fruit for the tradies every morning that they came.
There was a fine dust over everything including the toilet, full time. This persisted for a few weeks after the reno.
I had to take the benchtops back three times as they did not fit... the tap that I chose (wall mounted mixer tap) the plumber said to me the morning he came to fit it that it would not fit in the cavity wall so a cheapie from Bunnings was hastily found and is what's still there... and needs replacing already as it leaks... total time I think was about 4 weeks. From first ripping out of kitchen to functioning living in kitchen (minus paint on the walls, floors and kickboards). We have two of those three now LOL
I did use the IKEA 3d planner which was great.
What I like about the kitchen we built:
Finally... the circumstances that are life meant that so many things lined up to make it possible - one millimetre either way and it wouldn't have happened but everything fell into place...
So here's the 'before photos' - I'll add the 'reno in progress mess and dust and complications' ones and the 'finished/current' ones a bit later.
The first two pics are the kitchen.
 Use the stove as your reference point to 'join' the pics together in your mind... two 'door' ways and a window in there.
the next two pics are the room next to the kitchen.
 this pic above, the stove is juuuuust to the left of the pic - you can see the power cord where it's plugged in (installed by the previous owner, not us!) the next pic below is standing IN the 'dining' room (three doorways/entrances) looking north. in this pic, the small freezer that you can see above pic, is behind me in the pic below. Clear as mud eh... well basically two rooms, 5 doorways and one window...
As mentioned, one room was a dining room that had three door ways and no windows and we just didn't use eventually as it was so dim and really was a thoroughfare. The other room was a little kitchen, really only enough space for one person, with two doorways through it, a main thoroughfare, shallow benches and not much benchspace etc you get the idea.
We did everything except the legal stuff (plumb and electrical) and the wall removal, esp since it was partly structural. We did have a blowout in the plumbing (ummm we can use this drain but it's essentially holding together by time) which resulted in a trench right across the 'back room' which was interesting with a toddler and a gangplank. Not to mention that this was the room where 'everything' was (toaster, kettle and everything else) because the lounge was full of the flatpack, benchtops, appliances (as was the hall) and everything else that was in those rooms or had no other home was squished into bedrooms. We cooked and did dishes on on the outdoor table and bbq.
We almost halved the cost of the renovation by DIYing. We kept the slate we lifted from the kitchen floor (that was laid over the lino which we also removed) which was lucky because we needed it to repair the trench in the back room... a bout of viral arthritis made things very interesting along the way as in, couldn't turn on taps, open bottles or jars and at one stage dragged myself down the hallway because my knees couldn't work... but I did have a good friend come to the rescue with chocolates and yummies and a hug... and she freeway-trekked to do it.
Fresh coffe and buns/biscuits/fruit for the tradies every morning that they came.
There was a fine dust over everything including the toilet, full time. This persisted for a few weeks after the reno.
I had to take the benchtops back three times as they did not fit... the tap that I chose (wall mounted mixer tap) the plumber said to me the morning he came to fit it that it would not fit in the cavity wall so a cheapie from Bunnings was hastily found and is what's still there... and needs replacing already as it leaks... total time I think was about 4 weeks. From first ripping out of kitchen to functioning living in kitchen (minus paint on the walls, floors and kickboards). We have two of those three now LOL
I did use the IKEA 3d planner which was great.
What I like about the kitchen we built:
- went with all drawers, pullout pantry. The only thing that is 'shelves' (with one big door) is the TW cupboard.
- I didn't want overhead cupboards, so didn't.
- yay to my double bowl/double drainer sink
- yay to corner cupboards having fully pull-out bifold doors and corner basket carousel
- yay to wall height cupboards having wire baskets up the top instead of shelves so I can SEE what's up there.
- glass splashbacks and stainless. Contrary to popular opinion very easy to keep clean. Vileda chamois cloth and it's done. No wiping with a second cloth. no tiles and no grout. woot!
- the roller door cupboard - for the tea, coffee, cups, charger station, sunnies etc toaster, mobiles, brewing vanilla essence bottles and the block of chocolate that you don't want anyone to find *wink*
- bin is in a cupboard. yay.
- best bit - everything LOL
- TBH there's not much... I'm pretty happy with it and considering the time and planning that went into it, I guess that's why. ONE bit I'd change - that I listened to the benchtop people (one of the few times I strayed from my plan) when they said 800 was wide enough for the breakfast bar, and I wanted 1m. I persisted for a while and they were so sure so 800 it became. Well of course, it's a little shallow and it SHOULD have been 1m and would have worked beautifully.
- Choose the same colour benchtops but a different composition.
- I'd swap my corner carousel racks for corner drawers. maybe.
- no halogen downlights. If I knew then what I know now, I'd not do halogen. As it is we are planning (and slowly doing) replacing them with LEDs.
- We ran out of budget for the windows in the kitchen that are meant to go either side of the rangehood. ditto at the time for the floor covering, paint, kickboards etc. The floor boards finally went on when (not conceived at the time) Baby #5 was born and began crawling - losing a spud or a ball under the cupboard is one thing but not a small child!
Sunday, January 03, 2010
Update on the laundry Jan 2010
The laundry history pics are:
Laundry Reorganised - zero dollar reno
beginning of the real reno
progress of the reno
where it got to
Well all that's left is the benchtop to go on across the top/above the front loader and the final tiles on the wall. Oh and if I come up with something (?) for the window otherwise that is staying as is. First pic is standing at the door looking right, second pic is just a further right version - the cupboard has the nappy bucket in it, towel for drying hands after nappy changes/washing hands.
Third pic is standing at the door looking left. Oh and the two square baskets on top of the benchtop? I had intended to have nothing on the benchtop (space for folding clothes) and will be enough when the other one goes up and there's no change mat (put change mat down the side for visitors)... anyway the two baskets - one for ODD SOCKS and the other for clothes/cloths that are only good for cleaning. The odd socks basket gets a going through once a few weeks and long lost pairs are reunited. LOL
here's the 'before' (we'd just started ripping things out)
 and the after...

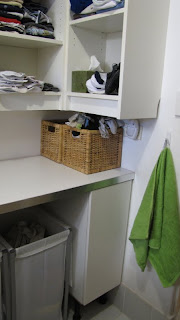
 Behind me (as I'm taking the pic) is the other two sets of drawers for Brooke and Jake's clothes (and shelving above for sports gear, spare blankets) , behind me left is where the school bags hang, behind me right is where the hats/jackets hang. Pic of the layout is here:
Laundry Reorganised - zero dollar reno
beginning of the real reno
progress of the reno
where it got to
Well all that's left is the benchtop to go on across the top/above the front loader and the final tiles on the wall. Oh and if I come up with something (?) for the window otherwise that is staying as is. First pic is standing at the door looking right, second pic is just a further right version - the cupboard has the nappy bucket in it, towel for drying hands after nappy changes/washing hands.
Third pic is standing at the door looking left. Oh and the two square baskets on top of the benchtop? I had intended to have nothing on the benchtop (space for folding clothes) and will be enough when the other one goes up and there's no change mat (put change mat down the side for visitors)... anyway the two baskets - one for ODD SOCKS and the other for clothes/cloths that are only good for cleaning. The odd socks basket gets a going through once a few weeks and long lost pairs are reunited. LOL
here's the 'before' (we'd just started ripping things out)
and the after...

 Behind me (as I'm taking the pic) is the other two sets of drawers for Brooke and Jake's clothes (and shelving above for sports gear, spare blankets) , behind me left is where the school bags hang, behind me right is where the hats/jackets hang. Pic of the layout is here:
- benches for folding,
- functional storage on the walls - all the baby clothes and nappies, a cupboard for the nappy bucket to keep little fingers out!,
- all the school/good clothes/DH work clothes get hung in there (above that is a shelf with tubs for storage of spare/seasonal things/linen),
- two of the children's drawers are in there (the top of that is extra horizontal space and the hanging above that), the other two are in the hall immed opposite so folding and away for the two smaller boys is easy, the others put their clothes away themselves. Above the drawers that you can see in the laundry is tubs for blankets/seasonal items.
- The 'changetable' is in there too... plus whatever else I can't think of atm...
- oh and no more ...interesting floor/wall tiles&paint combos LOL
- everything was done on a minimal budget... amazing what a coat of white paint and some seconds floor tiles can do! It was a very tiny laundry and poorly laid out (and a safety hazard!) but now with more effective use of space and maximising everything, it really feels quite 'roomy'.
- Once we're done with baby clothes and nappies in there, the fronts can go on the shelves (doors) and we'll have extra storage space. The cupboard that the nappy bucket is currently in can get changed over to drawers and used for other storage too

- school bags (pic below) are hung on the wall just outside the laundry, the corner of the hall between the laundry and the bathroom outer wall (see diagram). There's a few hats missing atm and we have a spare hats basket because with Auskick and cricket and various other things, there's always spare hats (which isn't a bad thing at all).
 that's about it for now :) oh, Brooke and Jake's drawers are on the left of this pic (just out of sight).


Friday, January 23, 2009
Laundry update... only a few bits to go


Progress pics so far are below and here's a link to what we started with, and here's a link to the progress pics we took along the way.
Still, at least the nappies and baby's clothes can go up - yay and the washing machine is back inside again. nice work to the tradies (Michael) and offsiders (Brooke, Jake and Zeke) with guest appearance by the grouter (me). LOL It was done on a very budget budget - tiles on sale, the hanging thing we already had from freecycle. The sorter we've had for over ten years now. The trough we also got a good deal on.
What's left to do? The benchtop that will go from trough, over washing machine and to the wall. The tiles on the wall (splashback), the step to go on. Also the pipes for the washing machine will no longer be visible as the are getting run through the bottom of the trough (where the door is). We did have to change things a little - was initially planning to have the trough offset and an L shape benchtop from under the window, to the trough and right round above the washing machine and to the wall but things needed to be changed. We also may raise the 'hanging space' by about 10cm. For the top shelf I've got clear tubs from IKEA - that's for all the blankets/sheets/sleeping bags etc. Also need to tidy up the window a little...
We're thinking a stainless colour benchtop, or black. WDYT?
Pardon the curvy edges to the pics - I was photostitching 3-4 pics together as otherwise you only get a snippet. Contemplating whether to put doors on the shelving... or maybe hang a plain curtain (no frilly bits). Need quite continuous access to it for a while being for nappies and baby items, so maybe will leave any doors off until after that. Just looks neater with doors I think... WDYT?
Still have the storage there, those drawers are Zeke's and the Baby's, the hanging space is for the school shirts, 'good' shirts and Michael's work pants and shirts. Directly behind me in that photo is Brooke and Jake's drawers, plus updated storage on top for cricket/footy/swimming/winter jackets etc. So we still have the same storage as in the before pics, just neater and much nicer space to be in - and minus the peach paint, blue and white wall tiles and blue floor tiles!
Monday, January 12, 2009
Gosh that's Grout!
 Okay so that's a dumb title but meh... LOL I did some grouting today :) Only about 1/4 or 1/5 laundry but still. Pleased with it and if I can get some more done then the shelves can go up in the laundry tonight. The grout isn't toxic to smell, it's good 'hands and knees' work (gets Baby in the right position) and will bring the laundry to completion quicker. I hope. I wore gloves as well and it's water cleanup so
 ... and the bonus is, grouting is a good way to keep your mind off intermittent contractions.
I had to laugh coz you know when you have your hands dirty the phone rings? I thought mm I'll just have mixed up a new batch of grout and my waters will break or something... or they'll darn well break all over the grout I just put DOWN! haha. Anyway, pic of my grouting efforts - hard to see eh - click to make it bigger.
Also a pic of our summer sink - generally speaking this is all we need to water the garden in the back yard... not bad really. Also, when you do it this way, you use less water at the sink because you're the one that's carting it out the back, not the plumbing carting it off somewhere else. This bowl catches the water from washing hands, rinsing dishes, rinsing veges or a glass or two. Admittedly we don't always do it but in the height of summer when it's been scorching for yonks and you just think all you have to do is 'turn on a tap'... well it gets you right on to conserving it...
While I'm here, our cherry tom haul grows every day - we pick them a day or so early and let them ripen in th
 e cupboard in a dish. Haven't had a bug problem yet. The marks on the toms are just from a rough wash outside - we rinsed them before we used them esp since we'd just put a heap more manure into the garden. When I made dinner last night we used all our own toms and still had some to spare. Also, these are the feral spuds that Brooke pulled up the other day [yet to add pic] - we didn't want them in that spot but let them go for a while to see how they'd do and considering they were pulled up early they did orright I think. Also, the other night we did a simple dinner - corn on the cob 66c each with a little butter, plus salad (lettuce and toms home grown, bulk purchase carrot, bulk purch cucumber, home grown spring onions, bought Aus company baby beets) with some grated cheese, and boiled egg... (soon to be receiving eggs from a chooky friend in exchange for vege etc)... fairly healthy meal, and quite economical too.
Also finished bottling up vanilla essence form the beans we got via coop a while ago - 2 bottles of vodka later - for the essence NOT for me! thanks to M for organising the bottle coop *thumbs up*. Our big bottle we did in November last year is a lovely dark colour and smells beee-u-tiful! Thassal from me - avagoodone!
Saturday, January 10, 2009
here we are - 37 weeks!
well thanks everyone for the best wishes  we made 37 weeks after continuous oh/off BH and ctx and loo runs for the last few weeks. Last night was a run of ctx for about an hour plus 5 loo trips in 10mins but I decided I was too tired lol since almost everyone else had had day sleeps except me this week! So I went and sat in my spot and snoozed between ctx and they settled down. See what the week holds
  Thanks again everyone

we made 37 weeks after continuous oh/off BH and ctx and loo runs for the last few weeks. Last night was a run of ctx for about an hour plus 5 loo trips in 10mins but I decided I was too tired lol since almost everyone else had had day sleeps except me this week! So I went and sat in my spot and snoozed between ctx and they settled down. See what the week holds Thanks again everyone on the laundry front: first lot of tiles are down, cut tiles still to go then grout. Then waiting for it all to dry (second coat of paint already on, waterproofing the floor Michael did before he tiled).. and THEN we can put everything back and it will just be a matter of getting the benchtops and he will be finished in there. Way to go Michael!
Wednesday, January 07, 2009
Did it snow?
hey... what happened in the laundry? Did it snow..? no... the first coat of paint is on! Far out - we know that when the paint goes on it makes a massive difference but it still is awesome to see each time the 'transformation' [yes aware that it's a laundry LOL]... so here's the updated pics... won't be long now! way to go Michael *grin*
The 'before paint' pics


The 'after paint' pi cs
cs

The 'before paint' pics


The 'after paint' pi
 cs
cs
Sunday, January 04, 2009
Laundry update

 Just a quick one. Nearly all the wall patching, plastering and cementing has been done. Just a few little bits to go then the sanding. Hoping to start on the walls/floor in the next day or two - I don't say 'we' because Michael has done pretty much the majority of it, and even then Brooke has done more in there than me! So here's an updated pic which compared to the original pics is looking like progress and of course, this other photo is what you MUST do to test any new 'thing' that comes into the house. It's not even in place in the laundry yet LOL - although I should know because this is exactly what happened when we renod the kitchen... little people 'trying out' all the cupboards!
Tuesday, December 30, 2008
Laundry reno - aka makin' a mess!
What else would you do to your laundry when you're almost 36 weeks pregnant lol - rip it out (Michael and the kids did the 'ripping out', I did the design and measurements/sourcing stuff etc)... well it kinda has to happen to put the new shelves in for the baby nappies and clothes... and well since it all needs doing now's the time - have to fix the wall to put the shelves in, have to do x to fix the wall so may as well do the next bit etc. Michael has made good progress. The washing machine is hooked up out the back right next to the (undercover) washing line so no hassles doing washing and just hang it right from the machine - no lugging baskets about haha!
This is the second 'makeover' the laundry has had since we've been here. the first one was to rip out the useless 'built in robe' that almost fell over when I pulled on it and replaced that with some useable hanging space, and drawers etc underneath - kinda ended up like this.
Anyway this time, on a mini ( almost nil lol) budget, floor and wall tiles are going, old shelving is going, old cavity (behind old shelving) has been bricked up (s/hand/free bricks) and new taps (woot!) quite economically priced - and yeehar a BENCHTOP woot woot! LOL - and an 'offset' trough (using the existing one no cabinet tho) so you can actually use it while it's in the corner - to save on plumbing costs, we're just replacing the main tap with an 'arm' tap, so it will swing out into the 'new' offset trough... The plan is something like this (you'll need to click on the pic to make it bigger) - I'll try to take a better pic in better light later one. Between the laundry and adjacent hallway, all four drawers for the kids will be in easy 'reach' to dish out the clothes/they can put their own away, which was the main reason for th
 e initial 'makeover' - so that everything can be sorted and put away in one room, except for kitchen and bathroom stuff. So kinda like a kitchen with benchtop, drawers, and underneath bench space for the dirty clothes sorters. Hanging space above on the non-benchtop side for school shirts etc as it currently exists.
Michael got one row in on the floor tiles before Brooke decided she'd help, and then Jake and then Zeke. So the kids lifted all the floor tiles of their own accord and Brooke now plans to mosaic a pot with them tomorrow. We'll have a couple of visiting children who will be keen as well so guess what the kids are doing tomorrow!
pics on the left are (far left) half the wall tiles removed, floor tiles almost do ne and the old taps still on - the old wall cavity bricked up. Next on the left i
 s new taps on, all wall tiles removed. the next pics on the right are (centre right) the old floor tiles coming up and (far right) the laundry in it's current state - almost all wall tiles gone, floor tiles gone, new taps in and wall cavity bricked up. So all the junk is OUT yay and the plastering up of the walls begin tomorrow, as well as getting the tiles. Who would have thought white floor tiles would be rare?! 'til the next installment of 'let's rip out your laundry' - catch you next time!
This is the second 'makeover' the laundry has had since we've been here. the first one was to rip out the useless 'built in robe' that almost fell over when I pulled on it and replaced that with some useable hanging space, and drawers etc underneath - kinda ended up like this.
Anyway this time, on a mini (
 almost nil lol) budget, floor and wall tiles are going, old shelving is going, old cavity (behind old shelving) has been bricked up (s/hand/free bricks) and new taps (woot!) quite economically priced - and yeehar a BENCHTOP woot woot! LOL - and an 'offset' trough (using the existing one no cabinet tho) so you can actually use it while it's in the corner - to save on plumbing costs, we're just replacing the main tap with an 'arm' tap, so it will swing out into the 'new' offset trough... The plan is something like this (you'll need to click on the pic to make it bigger) - I'll try to take a better pic in better light later one. Between the laundry and adjacent hallway, all four drawers for the kids will be in easy 'reach' to dish out the clothes/they can put their own away, which was the main reason for th
 e initial 'makeover' - s
 o that everything can be sorted and put away in one room, except for kitchen and bathroom stuff. So kinda like a kitchen with benchtop, drawers, and underneath bench space for the dirty clothes sorters. Hanging space above on the non-benchtop side for school shirts etc as it currently exists.
Michael got one row in on the floor tiles before Brooke decided she'd help, and then Jake and then Zeke. So the kids lifted all the floor tiles of their own accord and Brooke now plans to mosaic a pot with them tomorrow. We'll have a couple of visiting children who will be keen as well so guess what the kids are doing tomorrow!
pics on the left are (far left) half the wall tiles removed, floor tiles almost do
 ne and the old taps still on - the old wall cavity bricked up. Next on the left i
 s new taps on, all wall tiles removed. the next pics on the right are (centre right) the old floor tiles coming up and (far right) the laundry in it's current state - almost all wall tiles gone, floor tiles gone, new taps in and wall cavity bricked up. So all the junk is OUT yay and the plastering up of the walls begin tomorrow, as well as getting the tiles. Who would have thought white floor tiles would be rare?! 'til the next installment of 'let's rip out your laundry' - catch you next time!
Sunday, December 21, 2008
Belly-dweller update
34 weeks & 1 day
I'll get the next lot of belly pics probably tonight but in the meantime, an update since I haven't been online much. Must remember to update my 'before birth' (to do) list. Well I won't give the update on my last midwife visit until after the next one (which is in early Jan) - not because it's negative, it's not, it's just... annoying. I wasn't particularly happy with 'how' it went and didn't really realise that until after when I was telling Michael about it. It's all good though. One of those things and I suppose even midwives can slip up in how they speak about things.
Anyway... to the Little Belly-dweller. All is well and he's doing his thing. The uterus and the bowel have constant little tongue-poking at each other which ensures a loo visit after the Braxton Hicks (BH) and BH after the loo visit haha. This has been going on for a few weeks now so the bod is well any truly slipping into prep mode. The 'pre-milk' is in and has been for a week or so, clearing out the pipes for the good stuff *wink*

We will be 35 weeks next Saturday which means a min of 2 weeks to go ('term' birth is anywhere from 37 weeks and from 37 weeks on I can birth at the Birth Centre) right up to 42 weeks which would be 7 weeks away. So as of next week, anywhere from 2-7 weeks to go haha - can't tell I've been thinking about it - just looking forward to seeing him when the time is right - warm, alive, all squishy from being born...
Michael is bricking up the old 'shelf' (fromerly a window that the previous owner turned into shelving) in the laundry to make way for the new shelving and then I can finally put the baby nappies/clothes etc away - hooray (can you tell I've been itching to do this!). Brooke and Jake have their new drawers and soon Zeke and the Baby's drawers will be up and in as well. This is pt2 of the laundry 'reno' (on a mini-budget) so we'll see how we go.
The lovely Kirrily finished my bag - I bought a single one to replace the double that was stolen a few months ago... and lo and behold what arrived in the box but a full Day Tripper... xo Kirrily you and I both know you didn't have to and you also know how much it's appreciated and I am thankful for! Beautiful work as always and I have been so glad to put the calico bag aside that I was using and actually be able to find things again in my bag! *mwah*!
I keep wondering where this Baby will decide to arrive... under a gum tree over the park/side of the road, at home, at the Birth Centre, at school LOL - I'm really looking forward to it all starting (any time after 37 weeks) because it means he will finally BE here! I know along with that comes the lack of sleep and all the rest but he is so worth it.
Links that I am finding helpful/interesting - despite having had three natural labours and births (and one induced birth) already, you can never stop learning and improving where your mind is coming from - which in turn helps it work better with your body...
Ecstatic Birth - Nature's hormonal imprint for labor
Home Birth Stories of large babies
Why Choose Natural Child Birth
Natural Pain Relief
Best Birth Positions
As well there are pics from last weekend in Lancelin to add - this one is a sneak peek and is of the 'boat' Zeke and I made to float in the little 'channel stream' on the beach... The Amby is on it's way and I'm finalising all the last few bits and pieces in terms of Baby prep... oh yes and that's right, it's nearly Christmas (can you tell my focus is beyond that! haha) so just tidying up the last bits of that. Highly recommend to you the FLYlady Christmas CJ - in using this last year I had everything except the perishables ready by 1st Dec and breezed through Christmas ...
I'll get the next lot of belly pics probably tonight but in the meantime, an update since I haven't been online much. Must remember to update my 'before birth' (to do) list. Well I won't give the update on my last midwife visit until after the next one (which is in early Jan) - not because it's negative, it's not, it's just... annoying. I wasn't particularly happy with 'how' it went and didn't really realise that until after when I was telling Michael about it. It's all good though. One of those things and I suppose even midwives can slip up in how they speak about things.
Anyway... to the Little Belly-dweller. All is well and he's doing his thing. The uterus and the bowel have constant little tongue-poking at each other which ensures a loo visit after the Braxton Hicks (BH) and BH after the loo visit haha. This has been going on for a few weeks now so the bod is well any truly slipping into prep mode. The 'pre-milk' is in and has been for a week or so, clearing out the pipes for the good stuff *wink*

We will be 35 weeks next Saturday which means a min of 2 weeks to go ('term' birth is anywhere from 37 weeks and from 37 weeks on I can birth at the Birth Centre) right up to 42 weeks which would be 7 weeks away. So as of next week, anywhere from 2-7 weeks to go haha - can't tell I've been thinking about it - just looking forward to seeing him when the time is right - warm, alive, all squishy from being born...
Michael is bricking up the old 'shelf' (fromerly a window that the previous owner turned into shelving) in the laundry to make way for the new shelving and then I can finally put the baby nappies/clothes etc away - hooray (can you tell I've been itching to do this!). Brooke and Jake have their new drawers and soon Zeke and the Baby's drawers will be up and in as well. This is pt2 of the laundry 'reno' (on a mini-budget) so we'll see how we go.
The lovely Kirrily finished my bag - I bought a single one to replace the double that was stolen a few months ago... and lo and behold what arrived in the box but a full Day Tripper... xo Kirrily you and I both know you didn't have to and you also know how much it's appreciated and I am thankful for!
Beautiful work as always and I have been so glad to put the calico bag aside that I was using and actually be able to find things again in my bag! *mwah*!I keep wondering where this Baby will decide to arrive... under a gum tree over the park/side of the road, at home, at the Birth Centre, at school LOL - I'm really looking forward to it all starting (any time after 37 weeks) because it means he will finally BE here! I know along with that comes the lack of sleep and all the rest but he is so worth it.
Links that I am finding helpful/interesting - despite having had three natural labours and births (and one induced birth) already, you can never stop learning and improving where your mind is coming from - which in turn helps it work better with your body...
Ecstatic Birth - Nature's hormonal imprint for labor
Home Birth Stories of large babies
Why Choose Natural Child Birth
Natural Pain Relief
Best Birth Positions
As well there are pics from last weekend in Lancelin to add - this one is a sneak peek and is of the 'boat' Zeke and I made to float in the little 'channel stream' on the beach... The Amby is on it's way and I'm finalising all the last few bits and pieces in terms of Baby prep... oh yes and that's right, it's nearly Christmas (can you tell my focus is beyond that! haha) so just tidying up the last bits of that. Highly recommend to you the FLYlady Christmas CJ - in using this last year I had everything except the perishables ready by 1st Dec and breezed through Christmas ...
anyhoo, in case I don't catch you before then,
Best Wishes for the Season and the Brand New Year coming... xo
Best Wishes for the Season and the Brand New Year coming... xo
Sunday, November 30, 2008
Cheating at Pavlova but boy it was yum!
Well, Michael and I had the opportunity for cooking dinner together at home last night, just the two of us as the children went to Grandma and Grand ad's for their second only sleepover. Well the night didn't quite go as planned but nevermind... Maybe next time. Anyway, the way the night went meant we had dessert in the morning which was (bought) pavlova nests, whipped cream with blueberries in the middle and strawberries on top, drizzled with passionfruit juice and a side of fruit salad of all imaginable kinds of fruit, lychees, grapes, fresh cherries included. Anyway, here's dessert... ah... I mean breakfast. Very nice. Not your usual breakfast but apart from the sugar aspect, really quite healthy when you consider how much and varied fruit was in the fruit salad...
The kitchen is back together now, having had the floor put in we've moved the fridge and the free-standing cupboards back in. The floor has been partly mopped. Both boys have sore throats and Zeke a slight temp, although it doesn't seem to be bothering him too much which is good. Plans this week... oh endless lol but we'll see how much of that comes to be. Lots of sewing to be done. And plenty more other thins besides including hopefully kickboards in the kitchen. Got some red and curly lettuce seedlings today - my 'anti-bug' pak choy have about seen the end of their days (the bugs were eating the pak choy and leaving the lettuces alone, great co planter!) and the bugs are considering beginning their s econd course on the lettuce. I've noticed though they don't seem to touch the red curly lettuce at all, and barely touch the frizzmo green lettuce, so more of that to go in.
The kids were each given a beautiful quilt by a friend of their Grandparents, so I'll post photos of those shortly. Also in the works is Christmas - redoing my Holiday CJ (since my other was stolen with my bags) and we should be just about set. By this time last year I had all my Christmas prep done, so I'm thinking by the end of the first week of Dec I should be right for this year since I am beginning later this time. Starting the Christmas prep at the beginning of November works well. 'til next time!
 ad's for their second only sleepover. Well the night didn't quite go as planned but nevermind... Maybe next time. Anyway, the way the night went meant we had dessert in the morning which was (bought) pavlova nests, whipped cream with blueberries in the middle and strawberries on top, drizzled with passionfruit juice and a side of fruit salad of all imaginable kinds of fruit, lychees, grapes, fresh cherries included. Anyway, here's dessert... ah... I mean breakfast. Very nice. Not your usual breakfast but apart from the sugar aspect, really quite healthy when you consider how much and varied fruit was in the fruit salad...
The kitchen is back together now, having had the floor put in we've moved the fridge and the free-standing cupboards back in. The floor has been partly mopped. Both boys have sore throats and Zeke a slight temp, although it doesn't seem to be bothering him too much which is good. Plans this week... oh endless lol but we'll see how much of that comes to be. Lots of sewing to be done. And plenty more other thins besides including hopefully kickboards in the kitchen. Got some red and curly lettuce seedlings today - my 'anti-bug' pak choy have about seen the end of their days (the bugs were eating the pak choy and leaving the lettuces alone, great co planter!) and the bugs are considering beginning their s
 econd course on the lettuce. I've noticed though they don't seem to touch the red curly lettuce at all, and barely touch the frizzmo green lettuce, so more of that to go in.
The kids were each given a beautiful quilt by a friend of their Grandparents, so I'll post photos of those shortly. Also in the works is Christmas - redoing my Holiday CJ (since my other was stolen with my bags) and we should be just about set. By this time last year I had all my Christmas prep done, so I'm thinking by the end of the first week of Dec I should be right for this year since I am beginning later this time. Starting the Christmas prep at the beginning of November works well. 'til next time!
Thursday, November 27, 2008
All in one week!
 Well,
Well,  Monday began the floor. By Wed morning the patching was dry enough to lay the floor yippee!!! By mid morning Wed the new floor was IN - couldn't put the fridge or furniture back tho until after 10am Thur... which really means Thur night since Michael doesn't get home until then and I can't move the fridge on my own! lol Before and after pics coming, just have to load them up... we did the kitchen reno ourselves (apart from the legal tradies stuff) in Dec 2006 and finally the floor is in! Here's the 'before' pic on the right and two
  'after' pics on the right - same floor as in the lounge so it now 'flows through' a little more and wow the difference it makes when you walk in... of course... once the kickboards are done and we paint then it might look a little more complete (that and things will stop rolling under the cupboards!) but hey... slowly and surely we will get there and will be very pleased with the result no doubt! oh and yep... we'll be replacing the sheets of gyprock on the 'bench' above the sink with proper benchtop soon too... it just takes time and that other stuff! The drawing Brooke did for Brenna (that you can see on the benchtop in the first pic in the white frame) also now has a new home on the wall in the hallway...
Today, despite some early morning rain (which has me wishing for water tanks) the grid-solar went in - we went through Renewable Logic (which was initially on the 1500 for 1500 plan) and I have to say despite some hiccups along the way, their customer service is excellent and really, that's just as important as the product. A couple of little hmmmms? (existing meter, so not the solar people's fault at all) and it's all IN! We can see it when coming coming down the road on the way home from school and it's SUCH a good feeling! Both of those have been in the planning for many months (the solar) and years (the floor) lol and it's just sheer fortune of circumstance that meant we could do each, and both ended up happening in the same week! I'd take a pic but I am too blunt to see the solar from the ground lol and definately not ladder climbing... can see it from up the road so might try taking one from there... (will add it in when I do).
My Nanna is on the plane home tonight, looking forward to being home out the station tomorrow. We had a good time and the kids didn't want her to go home. Jake wrote a letter that went something like 'please NanNan can you stay at our house for 12 days pleeeeeeeeease' (12 days is a long time when you're seven remember!).
My bamboo prefolds from Donna at Bits for Bots came, as well as the bamboo flats. I had a couple of other parcels too and Mum sent down some Mango... mmmm one for breakfast each morning and the kids taking some to school - love the smell through the house!
Then tomorrow,
 Birth Centre - Zeke and I are catching the bus and train as the last of the gas conversion is being done for the vehicle. This also has been a LONG time in the making - with thanks to Bids on Gas who have been awesome to deal with. Then there's several big things happening over the weekend, and the kids are having their second-ever sleepover at Grandma and Grandads.
 Whew! Then it will be Monday again!
Oh and not this week but last week - here's pics of the cake that Brooke made and Jake decorated for his Birt
 hday (pic 1 on the left), and then the one I did for hi
 m for school (minimal sugar, no nuts, minimal egg) on the right - the fresh cherries and strawberries are 'toothpicked' into the cake as it was a warm day and otherwise they slide off, and there's the cake that he had at Grandma and Grandads, second on the left. Still to come is his cake for his Birthday party - and yes another one from the Debbie Brown books... which one will it be this time I wonder? *wink*
Monday, November 24, 2008
Mish mash
 So what's been happenin'? Well, first zucchini and at 17cm+ not a bad effort I reckon! I think the 'close proximity' planting has kept them hidden from the flying pickers so there's a bonus. There's still many flowers coming on and little zucchinis on the way. Planning a zuc/egg swap with A - thanks A! Have to go and freshen up the strawbale garden, leaving some things to seed but want to put more lettuce in as summer gets closer (well it should be here but you'd never know it!).
M has organised a bottle coop so we can bottle our vanilla essence that we made (from the Vanilla Essence coop) should we want to give that as Christmas Gifts. It's funny because I do look forward to Christmas but at the moment I'm looking beyond/through Christmas rather than at it, if that makes sense... only 10 weeks (or so) now until we meet our new Bub!
My Nanna has been here which the kids have loved - Jake just said to me he wished she didn't have to go home/stay at other people's places/could stay for 12 days... Brooke is enjoying having a fellow crossword/word search doer (I like them but don't often do them) and Zeke likes having someone hear his stories and chatter.
Oh and could I forget lol we (Nanna and I) went to the Andre Rieu concert on the weekend - it was Nanna's present from her kids (my Uncles and Aunties) and I was lucky enough to be chaperone. It was better than I anticipated it would be and I'll post one just on that later on. Worth going to if you get the chance, and definately not for just those into classical - rather those who like to be entertained and see some amazing talent. So thanks Mum for my ticket!
Floor - the floor was meant to go down today however the guy turned up took one look and said that aint gonna be done by today, tomorrow if you're lucky and it's looking like Wed now because the patched areas of the concrete won't be dry enough to glue the vinyl boards to... not to worry... eventually. Wed night Nanna is back here from my Aunty and Uncle's place and Nanna wants to see 'Australia' the movie so I'm taking her to that. Grid solar goes in on Thursday and Birth Centre appt on Friday. Then Sat is Jake's Party! This week will no doubt fly by and then I'll be 31 weeks! Here's what the Little One is up to this week...
Saturday, August 09, 2008
Laundry/Dressing room - aim for efficiency
Well it started out with a thread on the Large Families board on EB, specifically relating to this particular household(click on their 'home' pics)... anyway, if you go to their site and manage to scroll through the slideshow, you'll see their laundry room. That's what got me thinking - no, not about having that many children haha but more about their Laundry room. Rather than take the washing out, hang, bring in when dry, fold and sort, then distribute to the various rooms... why not do it this way and save a heap of time?
Add to that one of the Mums on the LF board started with tubs for each of her children...
I thought what a great idea and wanted to combine these two ideas... So bit by bit... Also, to mimimise my frustration at the children's clothes I had so neatly folded and put in their drawers only to be found all muddled up later on, I decided they could put their own clothes away, with help for the littlest of course. That way the answer to 'Mu-um... where's my....' would be 'in your tub' and/or in the wash/on the line and/or wherever you left it last because it's not in the washing!
Then a few people asked for pics and I explained that while I was rather pleased with the practical-ness of our 'laundry'... I was somewhat not happy with the aesthetics lol it's a far cry from the lovely laundries we see in reno shows (we're working on it tho, slowly lol).
Anyway, decided to put aside my... doubts lol about pics and share what we had achieved and how it worked.
Of course, with #5 arriving in Jan, we'll need to reshuffle where things fit, but generally I like where it's at in there. It's a MUCH nicer spot to be. Really only needs a coat of paint, a tidy and 'finishing off', plus something or other for the window... when we did the kitchen reno we contemplat ed putting a door to outside, where the laundry window is now, since the line is ~right there~ outside the laundry window... but the amount of plumbing in that wall was enough to put paid to that idea! So bear with me on the non-magazine look of it, and just take the practical. Click on the pics to be able to read the writing on them. We have an oddly laid out house but the pic on the left will help if you need to 'map' things in your head.
Directly copying and pasting my post in the LF board now:
we initially had a rack in the laundry for the school shirts and good clothes - once washed the were hu ng directly from the machine - no getting lost in the clean washing basket they were always there. And I was thinking boy if only we could do with more than just school shirts..!
This pic on the left is the 'left side' of the laundry looking in from the doorway. We have tubs one each for the children with names, I fold the washing into the laundry basket as I bring it off the line, into the laundry, 'dish out' the clothes the the relevant child's t ub and when their tub is full (or beforehand) they come and empty it - littlest one needing a hand of course. The new Baby's clothes will go directly on the (yet to be installed) shelves which will be on the right hand side when you walk in.
The other thing is there is no more/less 'Mum where's my..?'
because the answer is usually, 'in your tub, in the wash/on the line or on the floor where you left it' haha so they're not waiting for me to sort and put away the washing iykwim.
W e also tore out the old useless linen cupboard, and via Freecycle, found the inside of someone's BIR - top shelf and clothes rail thing - so all the blankets etc go on the top shelf and the clothes all get hung - shirts, good clothes, school etc esp the stuff we wear all the time, work clothes etc.
Also, there is a small set of drawers for underwear, bathers, etc that the kids share and on top of that goes their school bags and footy bags - clean footy gear and boots go right into the bag so that come Sunday morning there's no/less 'frantic' hu nting for stuff. The drawers are divided up as well, so it's easy to see where the boys and girls stuff goes, as well as a super-easy pyjama drawer that really once the clothes are in, anyone would know who's pyjamas are what.
This pic on the left is the 'middle' of the laundry when looking in from the door way - I am looking to install a 'workbench/countertop' above, to make it easy to reach things and to make better use of the space. Also in t he laundry is the nappy bucket (we dry pail so no soaking), nappy stash (mostly fitteds and covers, but a few AIO/pocket and we're trialling prefolds this time), change table mat (which lays on top of the washing machine when in use), washing machine, dirty clothes sorter, trough and a shoe rack, which we admittedly need a 2 storey one off, and we don't really have that many shoes. There's a small basket that the school shirts and kids socks go in so I don't have to HUNT for them to wash them, and the bag for swimming. Swimming gear gets hung
 straight from the shower onto the small rail in the bathroom. Clean towels go straight from the clean folded basket in the laundry into he swimming bag, where the goggles and swim passes are also.

Oh and did I mention we have a tiny laundry? lol
Floor space before we did all this was lucky to be 1m x 0.5 m square, now it's about 1mx1m square
  in floor space so we have actually made *more* room, fitting more in there and making it 'work' better iykwim
oh and that's just the start of the nappy stash! lol
The pic on the right is the 'right side' of the laundry when looking in from the doorway. The kids main clothes drawers are directly opposite the laundry door, (so behind me while I'm taking these pics from the door way) in the hall there (we have a wierd house layout see floor plan) so they only have to go a couple of metres to put their stuff away. They all share one room and besides the drawers being closer to the laundry by not being in their bedrooms, there's not room in the bedroom anyway The hat rack (an aptly 'grown' brang with 'arms' from the park across the road lol) and 'coat rack' (IKEA, about $5.95 each) are on the wall opposite the kids main drawers in the hall outside the laundry.
Admittedly the drawers in the wide hall beside the laundry aren't 'pretty' and a lovely waist high unit would be nice but ah well make do with what we have yk
 Towels are stored in the bathroom, on the shelf above where the wet bathers etc drip into the bath... the mop hangs there too after use and since our bath is out of order as the taps are siezed (old old plumbing lol) it's no consequence really that the mop drips in the bath iykwim.
Sheets are in the bottom drawer for the kids and in our wardrobe for us - we have builtins in our room so that's where the bulk of our stuff is. BIR in the guest room, but we long ago removed the BIR from the room that B1, J & Z share. FLYlady also recommends storing the clean sheets between the mattress and base on the bed - they are right there when you need them - no need to search for which sheets for which bed AND somewhere (BH&G? or Flylady) the tip was store the mathching flat and fitted sheet ~inside~ the matching pillowcase so always have a 'set' on hand.
And finally on the right is where the proposed (recycled timber) shelving will go so I can house the rest of the nappy stash (the above pics are mostly NB and small nappies) - for the OSFM nappies as well as for the Baby clothes.
So this is a combo of LF inspiration, FLYlady and 'that' Large Family, and I LOVE it - washing takes far less time, is less onerus and much much more organised. And yes now I fold right from the line bc when I sit the basket on top of the trough, I just assign the folded items to each pile. Items to hang are laid flat in the basket and hung right away. In summer, I often hang the hanging stuff still-damp straight from the machine - dries in no time and much less wrinkly, and not as stiff as it would be from hanging outside on a summer day (our lines are all under cover but still they get hot under there as they are near the roof).
 HTH and yep it's very worth it!
Add to that one of the Mums on the LF board started with tubs for each of her children...
I thought what a great idea and wanted to combine these two ideas... So bit by bit... Also, to mimimise my frustration at the children's clothes I had so neatly folded and put in their drawers only to be found all muddled up later on, I decided they could put their own clothes away, with help for the littlest of course. That way the answer to 'Mu-um... where's my....' would be 'in your tub' and/or in the wash/on the line and/or wherever you left it last because it's not in the washing!
Then a few people asked for pics and I explained that while I was rather pleased with the practical-ness of our 'laundry'... I was somewhat not happy with the aesthetics lol it's a far cry from the lovely laundries we see in reno shows (we're working on it tho, slowly lol).
Anyway, decided to put aside my... doubts lol about pics and share what we had achieved and how it worked.
Of course, with #5 arriving in Jan, we'll need to reshuffle where things fit, but generally I like where it's at in there. It's a MUCH nicer spot to be. Really only needs a coat of paint, a tidy and 'finishing off', plus something or other for the window... when we did the kitchen reno we contemplat
 ed putting a door to outside, where the laundry window is now, since the line is ~right there~ outside the laundry window... but the amount of plumbing in that wall was enough to put paid to that idea! So bear with me on the non-magazine look of it, and just take the practical. Click on the pics to be able to read the writing on them. We have an oddly laid out house but the pic on the left will help if you need to 'map' things in your head.
Directly copying and pasting my post in the LF board now:
we initially had a rack in the laundry for the school shirts and good clothes - once washed the were hu
 ng directly from the machine - no getting lost in the clean washing basket they were always there. And I was thinking boy if only we could do with more than just school shirts..!
This pic on the left is the 'left side' of the laundry looking in from the doorway. We have tubs one each for the children with names, I fold the washing into the laundry basket as I bring it off the line, into the laundry, 'dish out' the clothes the the relevant child's t
 ub and when their tub is full (or beforehand) they come and empty it - littlest one needing a hand of course. The new Baby's clothes will go directly on the (yet to be installed) shelves which will be on the right hand side when you walk in.
The other thing is there is no more/less 'Mum where's my..?'
because the answer is usually, 'in your tub, in the wash/on the line or on the floor where you left it' haha so they're not waiting for me to sort and put away the washing iykwim.

W
 e also tore out the old useless linen cupboard, and via Freecycle, found the inside of someone's BIR - top shelf and clothes rail thing - so all the blankets etc go on the top shelf and the clothes all get hung - shirts, good clothes, school etc esp the stuff we wear all the time, work clothes etc.
Also, there is a small set of drawers for underwear, bathers, etc that the kids share and on top of that goes their school bags and footy bags - clean footy gear and boots go right into the bag so that come Sunday morning there's no/less 'frantic' hu
 nting for stuff. The drawers are divided up as well, so it's easy to see where the boys and girls stuff goes, as well as a super-easy pyjama drawer that really once the clothes are in, anyone would know who's pyjamas are what.
This pic on the left is the 'middle' of the laundry when looking in from the door way - I am looking to install a 'workbench/countertop' above, to make it easy to reach things and to make better use of the space. Also in t
 he laundry is the nappy bucket (we dry pail so no soaking), nappy stash (mostly fitteds and covers, but a few AIO/pocket and we're trialling prefolds this time), change table mat (which lays on top of the washing machine when in use), washing machine, dirty clothes sorter, trough and a shoe rack, which we admittedly need a 2 storey one off, and we don't really have that many shoes. There's a small basket that the school shirts and kids socks go in so I don't have to HUNT for them to wash them, and the bag for swimming. Swimming gear gets hung
 straight from the shower onto the small rail in the bathroom. Clean towels go straight from the clean folded basket in the laundry into he swimming bag, where the goggles and swim passes are also.
Oh and did I mention we have a tiny laundry? lol
Floor space before we did all this was lucky to be 1m x 0.5
 m square, now it's about 1mx1m square in floor space so we have actually made *more* room, fitting more in there and making it 'work' better iykwim
oh and that's just the start of the nappy stash! lol
The pic on the right is the 'right side' of the laundry when looking in from the doorway. The kids main clothes drawers are directly opposite the laundry door, (so behind me while I'm taking these pics from the door way) in the hall there (we have a wierd house layout see floor plan) so they only have to go a couple of metres to put their stuff away. They all share one room and besides the drawers being closer to the laundry by not being in their bedrooms, there's not room in the bedroom anyway
The hat rack (an aptly 'grown' brang with 'arms' from the park across the road lol) and 'coat rack' (IKEA, about $5.95 each) are on the wall opposite the kids main drawers in the hall outside the laundry.Admittedly the drawers in the wide hall beside the laundry aren't 'pretty' and a lovely waist high unit would be nice but ah well make do with what we have yk
 Towels are stored in the bathroom, on the shelf above where the wet bathers etc drip into the bath... the mop hangs there too after use and since our bath is out of order as the taps are siezed (old old plumbing lol) it's no consequence really that the mop drips in the bath iykwim.
Sheets are in the bottom drawer for the kids and in our wardrobe for us - we have builtins in our room so that's where the bulk of our stuff is. BIR in the guest room, but we long ago removed the BIR from the room that B1, J & Z share. FLYlady also recommends storing the clean sheets between the mattress and base on the bed - they are right there when you need them - no need to search for which sheets for which bed AND somewhere (BH&G? or Flylady) the tip was store the mathching flat and fitted sheet ~inside~ the matching pillowcase so always have a 'set' on hand.
And finally on the right is where the proposed (recycled timber) shelving will go so I can house the rest of the nappy stash (the above pics are mostly NB and small nappies) - for the OSFM nappies as well as for the Baby clothes.
So this is a combo of LF inspiration, FLYlady and 'that' Large Family, and I LOVE it - washing takes far less time, is less onerus and much much more organised. And yes now I fold right from the line bc when I sit the basket on top of the trough, I just assign the folded items to each pile. Items to hang are laid flat in the basket and hung right away. In summer, I often hang the hanging stuff still-damp straight from the machine - dries in no time and much less wrinkly, and not as stiff as it would be from hanging outside on a summer day (our lines are all under cover but still they get hot under there as they are near the roof).
HTH and yep it's very worth it!
Subscribe to:
Posts (Atom)
